Oct 13, 2026
Green Bay Hail Damage Roof Replacement: GAF Timberline HDZ in Barkwood



Key Takeaways
|
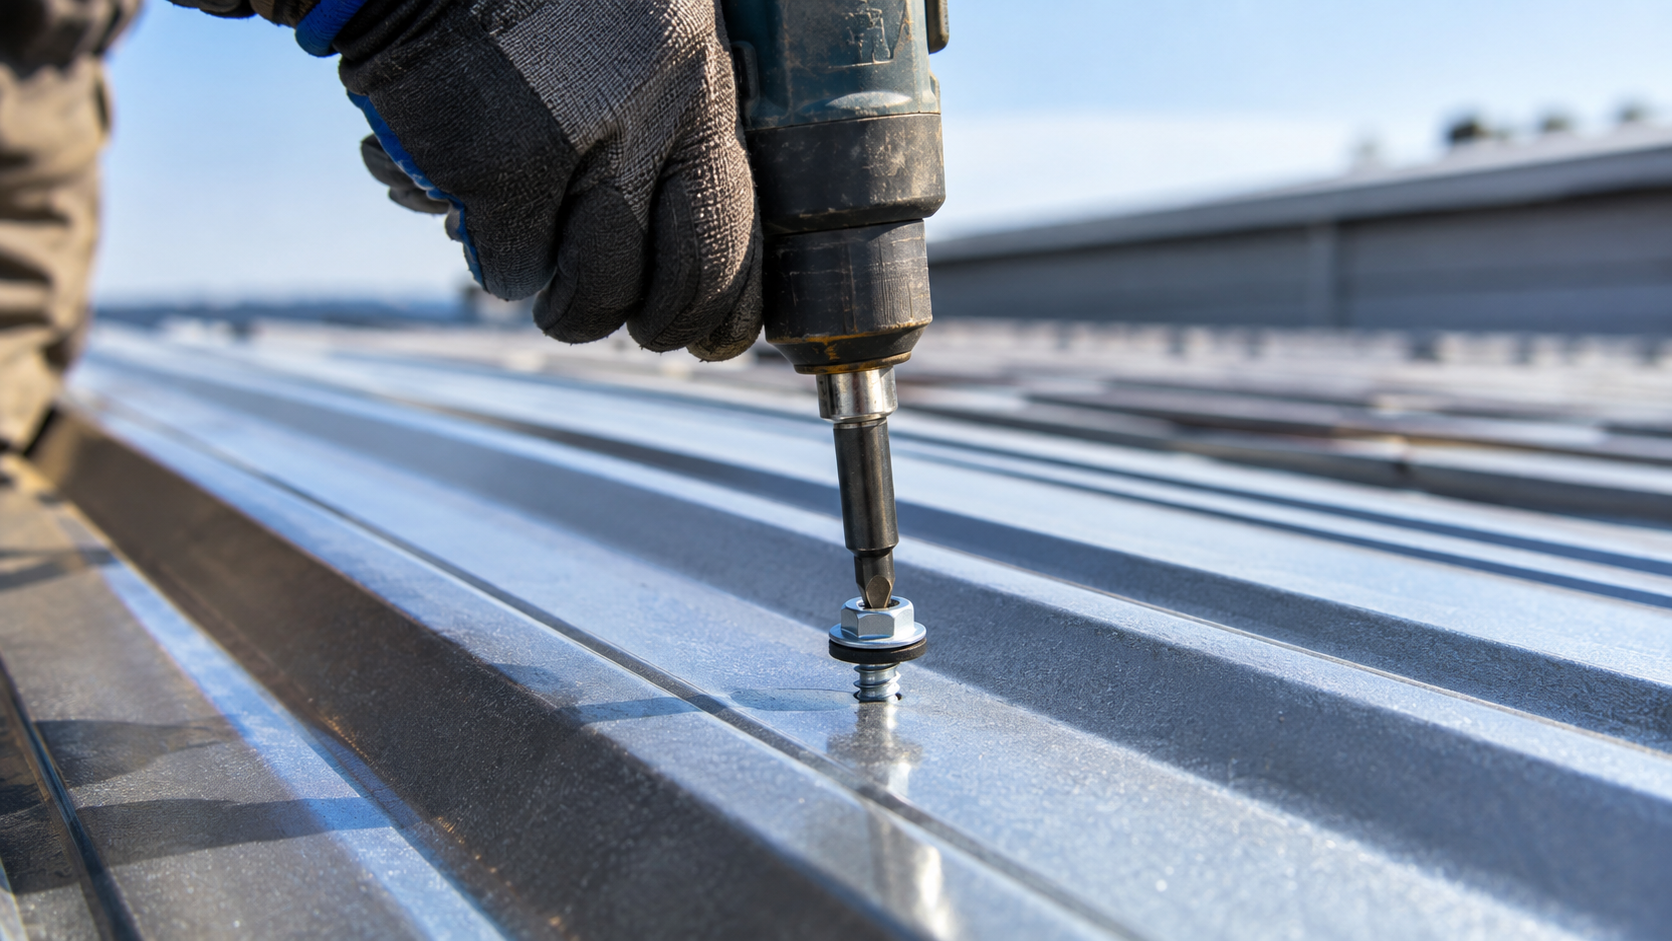
Incorrect screw placement can cause leaks, loose panels, and wind damage even when the rest of a metal roof is installed correctly. Common problems include driving screws too deep, leaving them too loose, using the wrong fastener, or placing them too far apart.
Getting the fastening details right protects the roof from these problems and helps the panels stay securely attached. In this guide, you’ll learn where metal roofing screws should be placed, how to fasten them correctly, how spacing changes by panel type, how many screws you may need, and how to identify fastening problems before they turn into leaks.
Fastener problems are a common source of leaks on exposed-fastener metal roofs. Incorrect placement, overdriving, undertightening, and deteriorated washers can all compromise the seal around a fastener.
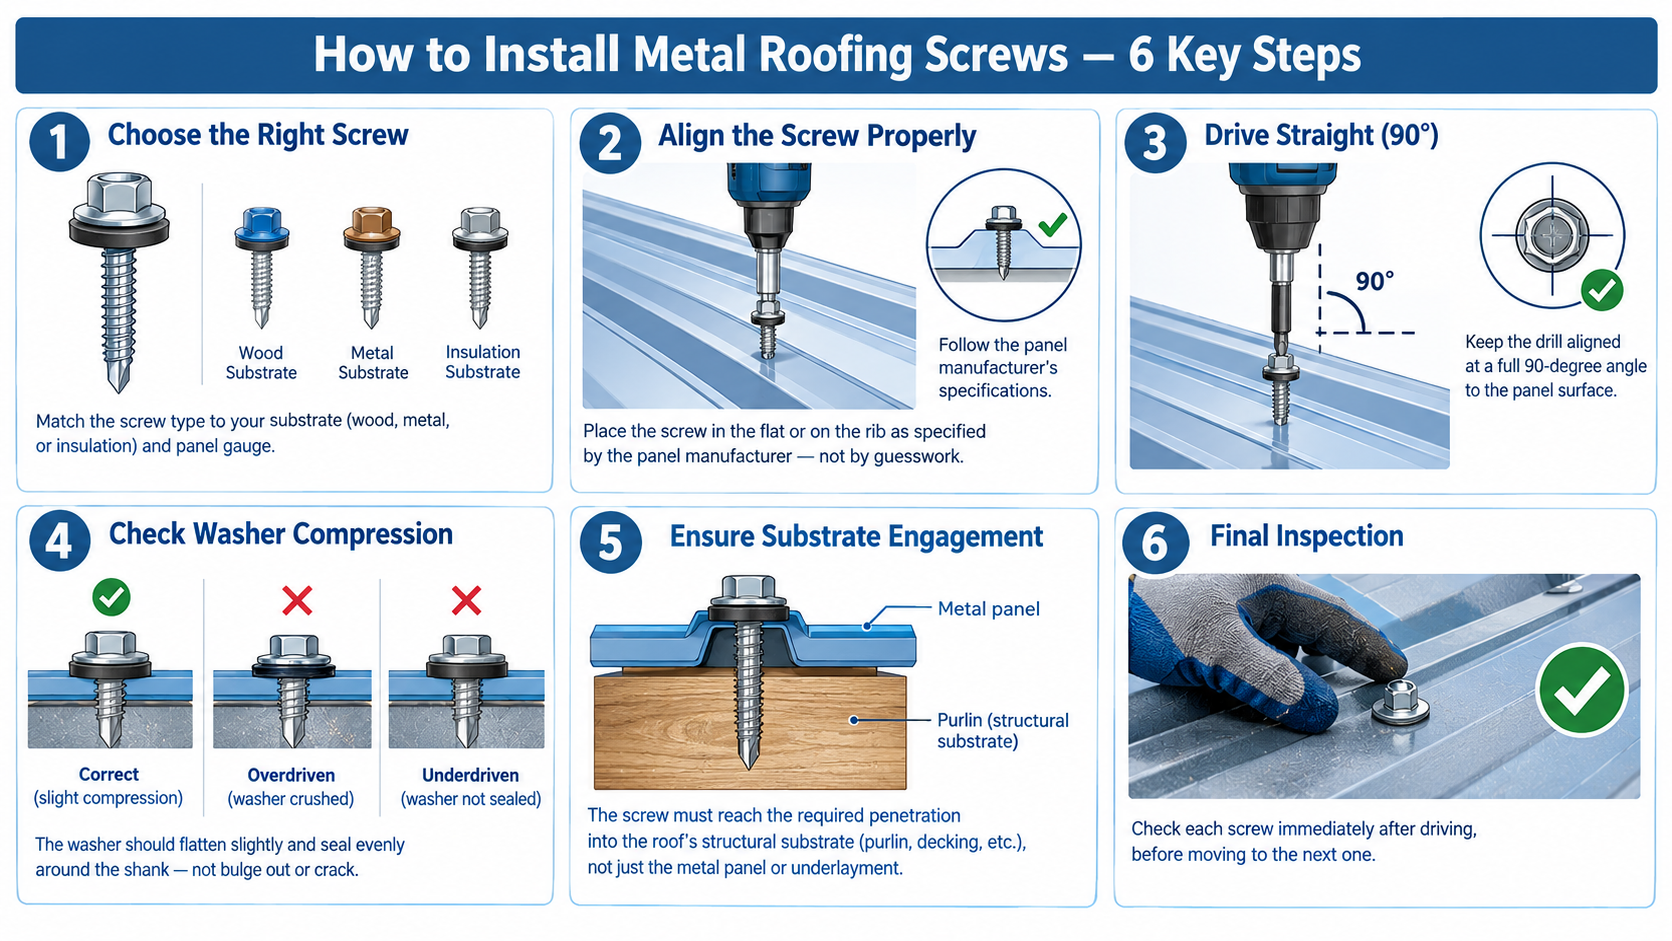
Fastening a metal roof screw correctly comes down to six steps, done in order, every time.
A properly driven screw stops turning the moment the washer seals. If the drill keeps spinning past that point, back off immediately, since every extra turn crushes the washer a little more.
Our roof installation crew builds this sequence into muscle memory. Skipping any one step turns a small installation error into a leak months later.
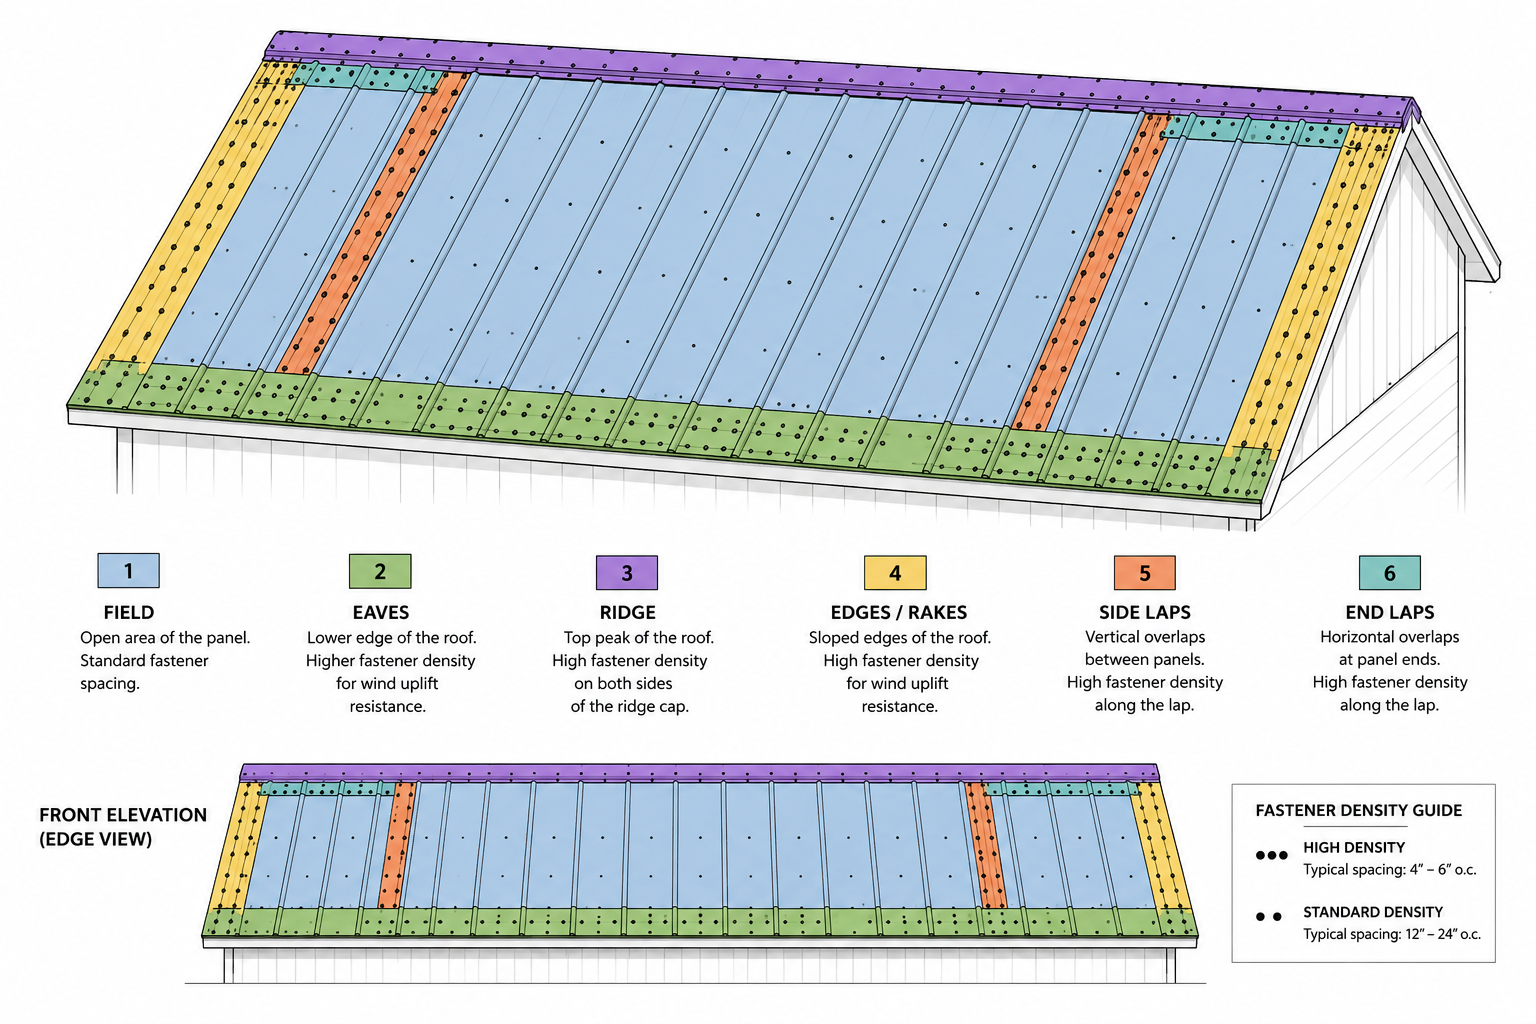
Every metal roof has six zones that need fasteners, and each one plays a different structural role.
| Zone | Why It Needs Fasteners |
| Field | Holds the main panel body flat against the deck across its full length |
| Eaves | Anchors the panel’s lower edge against wind uplift and water runoff |
| Ridge | Secures the panel’s top edge and seals the peak against driving rain |
| Edges (rakes) | Wind suction is strongest at roof edges, so this zone resists blow-off |
| Side laps | Joins adjacent panels into one continuous, watertight surface |
| End laps | Joins panel ends where one sheet overlaps the next up the slope |
Field areas generally follow the standard fastening pattern, while eaves, edges, and laps may require additional or closer fastening based on manufacturer specifications and design loads.
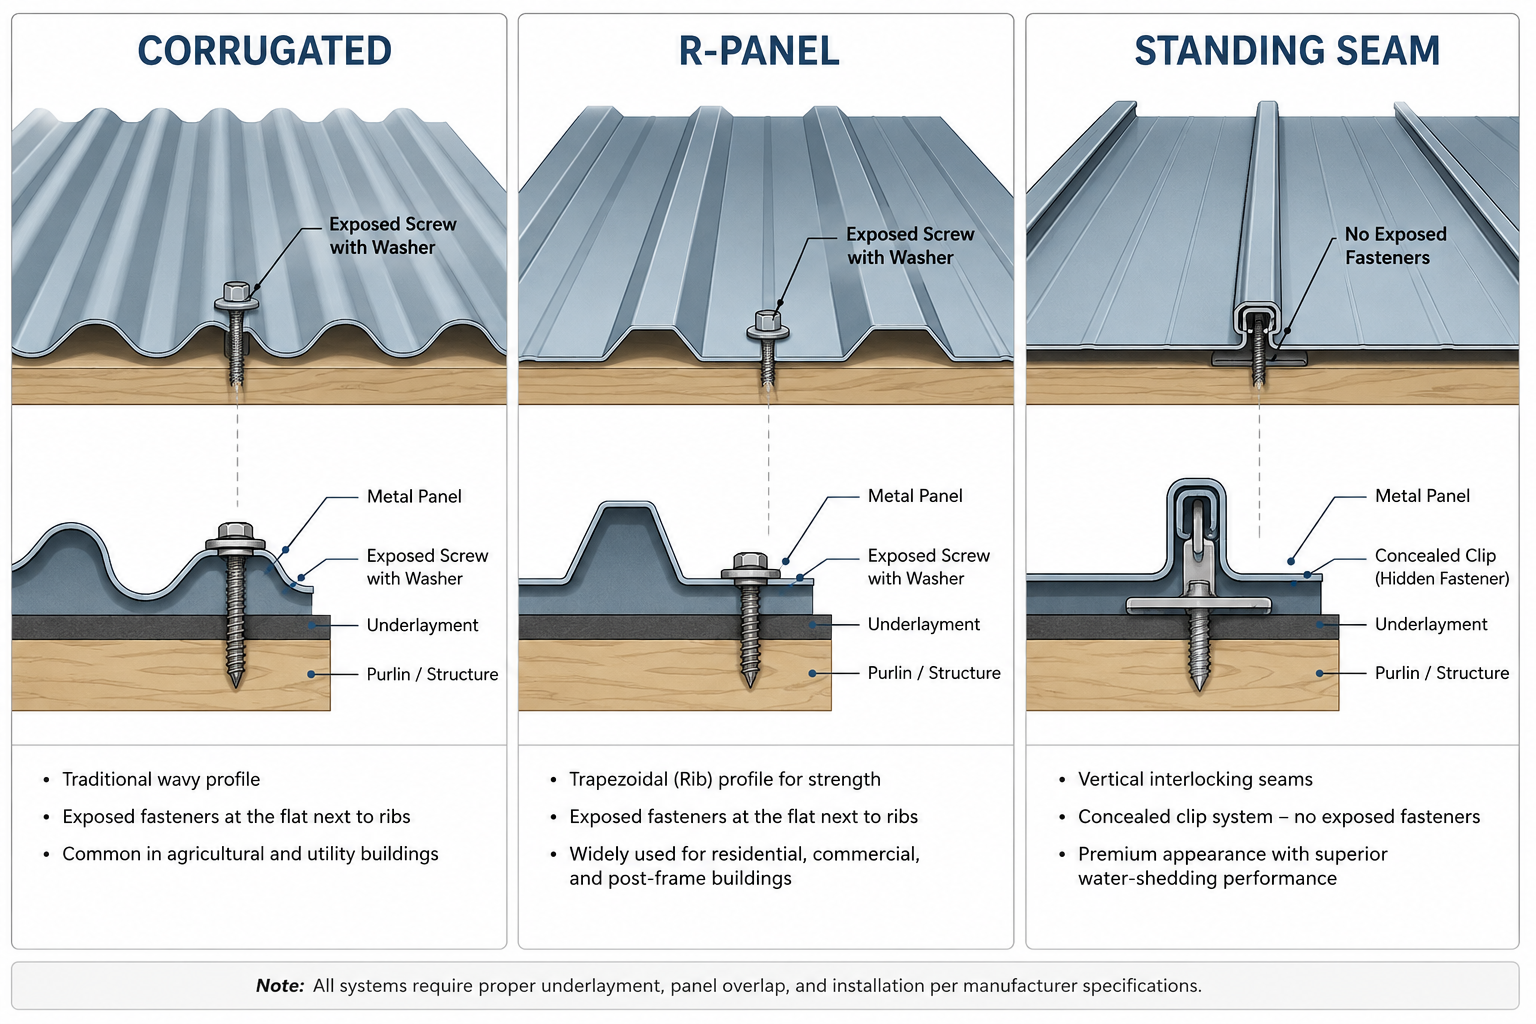
Panel profile changes two things at once: whether screws go on the rib or the flat, and how the fastener pattern is laid out across the panel. What works for one profile can be wrong for another.
For some five-rib corrugated panel systems, a fastening layout may place screws alongside each rib, with rows spaced at specified intervals. The exact pattern varies by panel profile, substrate, wind requirements, and manufacturer instructions.
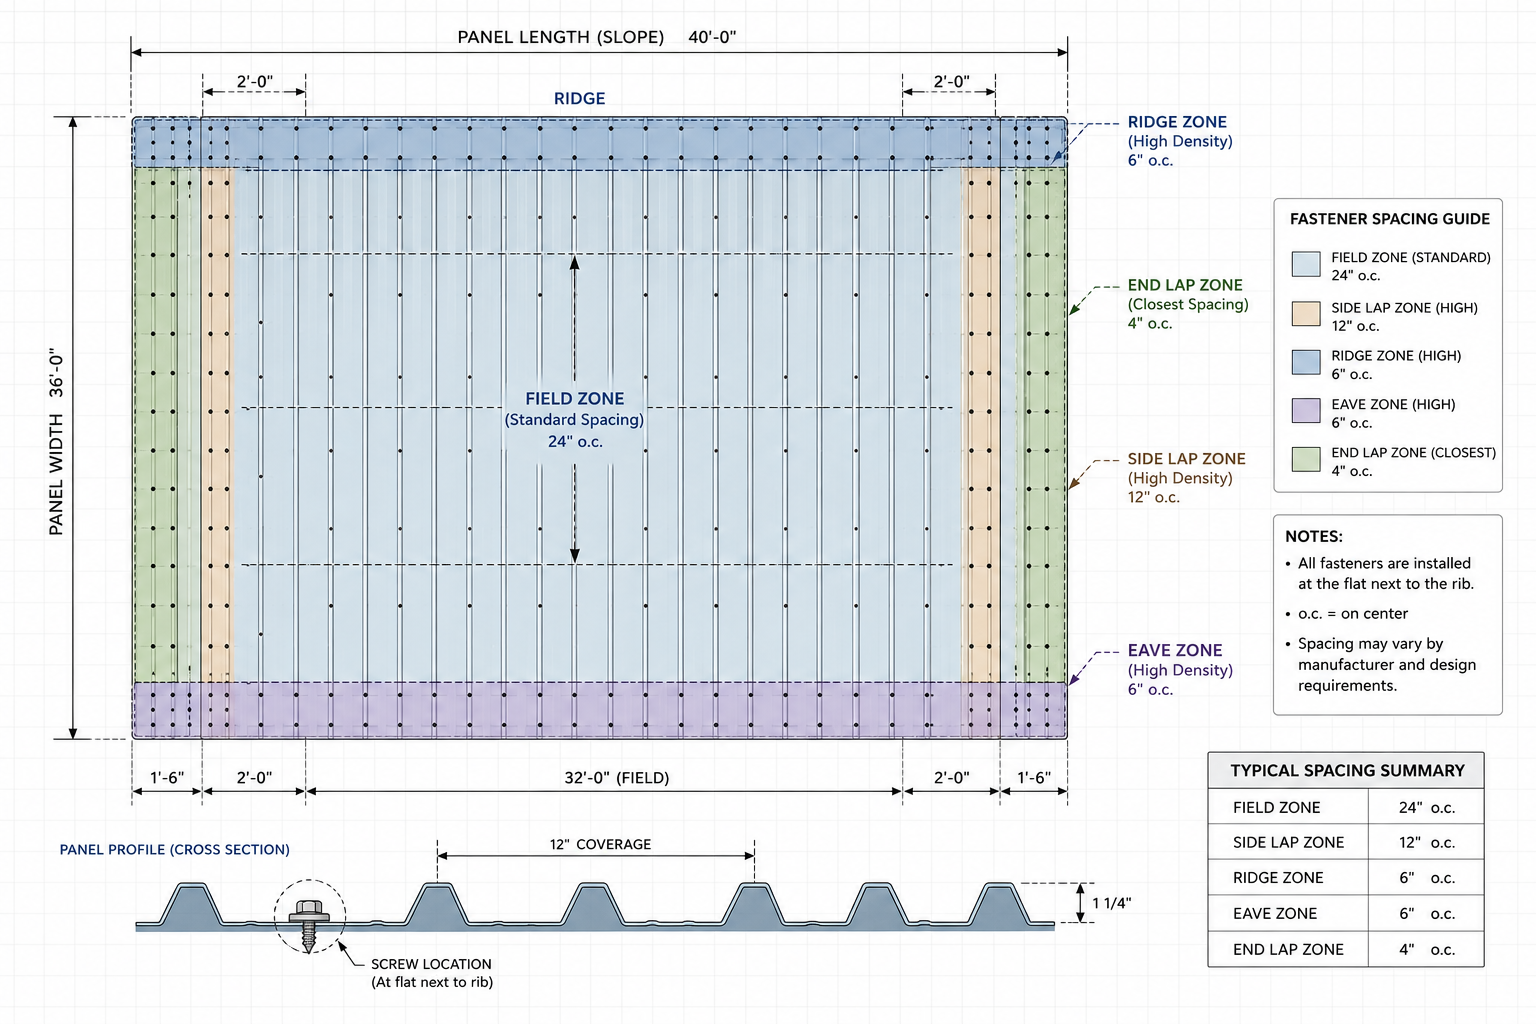
Spacing numbers shift by zone, and every zone tightens up compared to the open field.
| Roof Area | Fastening Approach |
| Field | Follow manufacturer-specified spacing |
| Eaves | May require closer fastening |
| Ridge | Follow the panel/trim fastening schedule |
| Rakes/edges | Often require increased fastening |
| Side laps | Follow specified stitch-screw spacing |
Metal roofing screws are often installed at intervals of 12-, 18-, or 24-inch on-center intervals, but there is no universal spacing for every metal roof. The panel manufacturer’s fastening schedule and applicable building requirements determine the correct pattern.
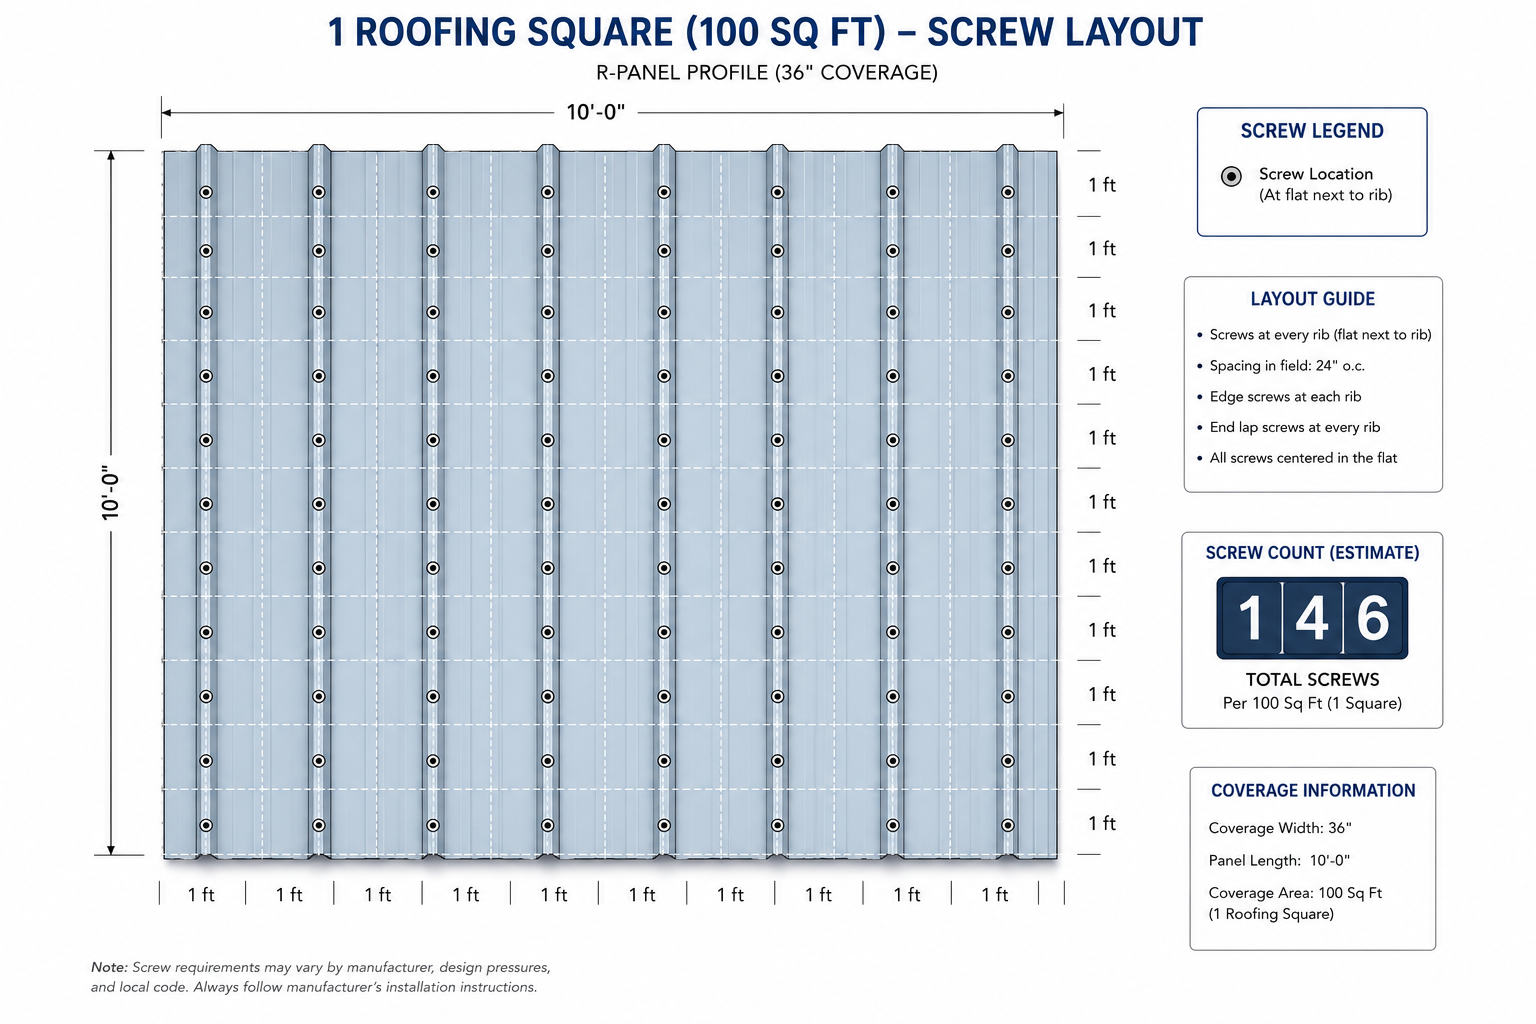
Once spacing is set, screw count becomes simple math against a roofing square, which equals 100 square feet.
A roofing square equals 100 square feet, but there is no universal screw count per square for metal roofing. The quantity depends on panel coverage, rib spacing, fastening intervals, laps, edges, and the required wind-load pattern.
Factors that move this number up or down:
Always confirm the final quantity against the panel manufacturer’s fastening schedule before ordering. It’s the one document that overrides every rule of thumb on this page.
These are the errors that turn a correctly designed spacing plan into a leaking roof.
A leak from any one of these rarely shows up right away. By the time it does, it’s usually a straightforward roof repair rather than a full re-fastening, if it’s caught early.
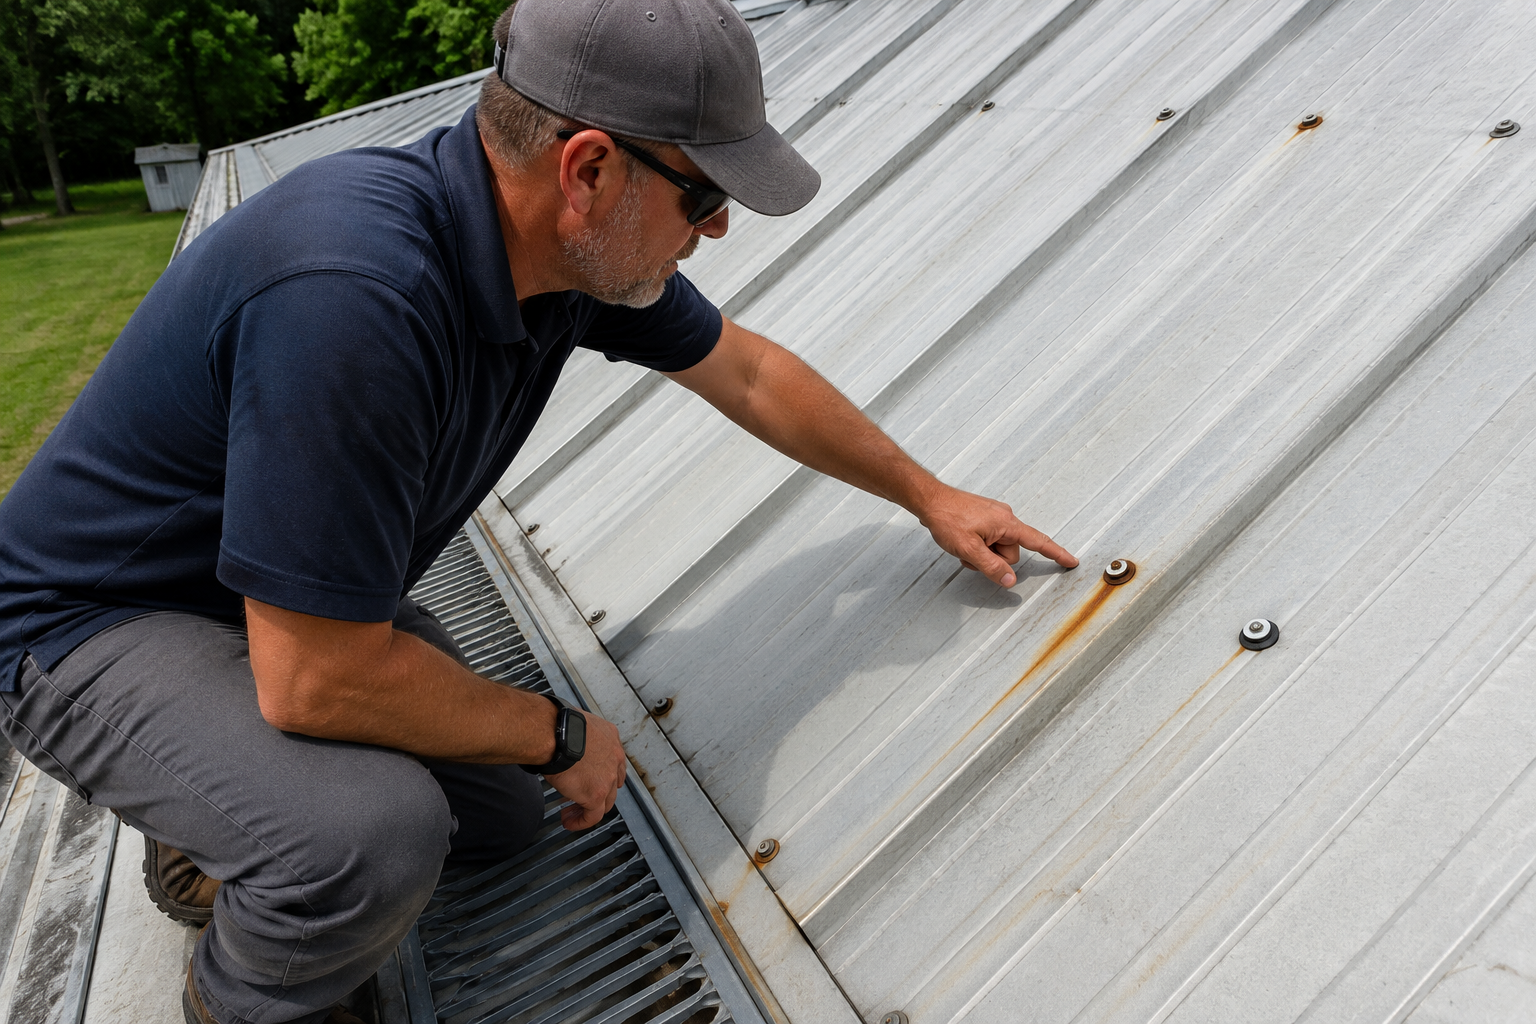
This is a periodic check, done from the ground or during a roof walk, separate from the installer’s screw-by-screw check during the original install.
Our roof inspection covers all five of these points as a matter of course, along with everything else on the roof surface.
Spacing charts and fastening schedules only help if they’re applied correctly on the actual roof in front of you. A few situations where it’s worth bringing in a professional rather than handling it yourself:
Getting fastener placement right the first time is what separates a metal roof that lasts decades from one that needs constant attention. Our team handles every step of that process across our full range of roofing services, from initial install to ongoing repairs.
Screw spacing and placement decide whether a metal roof performs for decades or starts leaking within a few years. The details matter: the right fastener, the correct angle, proper washer compression, and spacing that matches your panel’s fastening schedule.
At Statewide Roofing Specialist, our GAF Master Elite-certified team follows manufacturer specifications for every metal roof we install or repair across the Piedmont Triad. If you’re planning a new metal roof or want an existing one checked, we’re ready to help you get it right the first time.
Call: 336-936-5245
Serving Greensboro, Winston-Salem, High Point, and all of NC, SC, and TN.
Screw length depends on what the screw needs to pass through before reaching solid material. It generally ranges from 1 to 2.5 inches, covering the panel itself plus any insulation or underlayment, with enough length left to fully engage the decking or framing underneath. The panel manufacturer’s fastening schedule sets the exact figure for your project.
Most metal roofing screws are self-drilling and don’t require a pre-drilled hole under normal conditions. Pre-drilling can help with thicker-gauge panels, harder substrates, or when there’s a risk of the self-drilling tip wandering off target. Check the screw manufacturer’s guidance before deciding either way.
Use a screw gun with an adjustable depth-sensing clutch, hold the tool perpendicular to the panel surface, and let the self-drilling tip start the hole rather than forcing it in at an angle. A quick visual check on each screw as you go catches a crooked entry before it’s driven all the way in.
It shouldn’t happen on a properly installed roof, but it can occur over time due to thermal expansion and contraction, wind vibration, or a screw that was undertightened during installation. This is exactly what a periodic inspection is meant to catch before it turns into a leak.
Yes. Metal panels can be fastened directly into plywood decking using self-tapping wood screws, provided the plywood is sound and the screw achieves full penetration into the wood. Deteriorated or delaminated plywood should be replaced first, since a screw has nothing solid to grip otherwise.
Hex washer head screws in the 1/4-inch to 5/16-inch range are the most common sizes used on metal roofing. The right size depends on the panel manufacturer’s specifications and must match the driver bit or socket used to install it.
It depends on the panel’s width, rib count, and length. Across the panel’s width, screws typically go beside each rib or every other rib per the fastening schedule. Along its length, a screw goes in at every point the panel crosses a purlin or at the specified row spacing. A long panel on wide framing will need more screws than a short panel on tightly spaced framing.
Beyond the fastening mistakes already covered, avoid skipping the manufacturer’s fastening schedule in favor of a generic spacing rule, mixing incompatible metals that can cause galvanic corrosion between the screw and the panel, and walking on panels incorrectly, which a dent the metal or loosen nearby fasteners. Ignoring local wind or snow load requirements when setting fastener spacing is another common and costly oversight.